
Pacemaker insertion
Details
Role: Illustrator (independent project), supervised by Michael Corrin, University of Toronto
Audience: Surgeons in-training
Description: The illustration above depicts one rendered frame from a 10-step surgical procedure (below) to insert a pacemaker, as performed by Dr. Stephanie Brister at Toronto General Hospital in 2011. It is illustrated from the surgeon's perspective.
Medium: Adobe Photoshop and Adobe Illustrator.
Individual steps

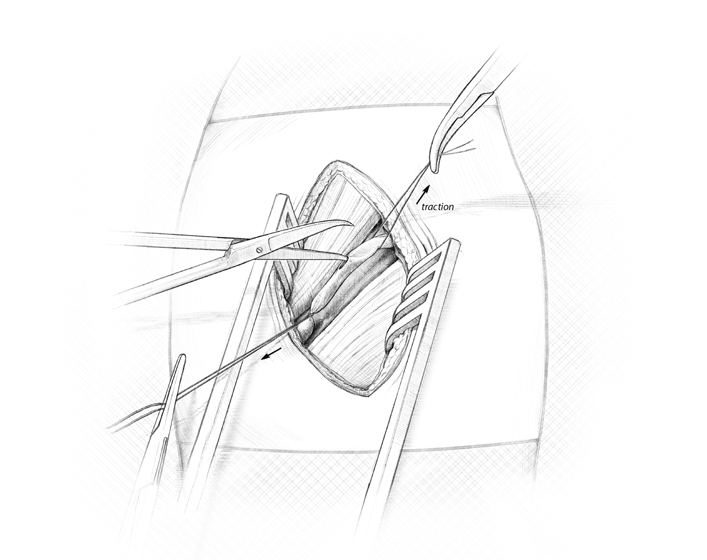
Step 1. Initial incision
The patient is positioned in the supine position with arms relaxed against the body and head turned away from the surgical field. A 5cm horizontal incision is made across the delto-pectoral triangle. The tissues are dissected until the pectoralis major, deltoid and cephalic vein are exposed.
Step 2. Venous access
The distal end of the exposed vein is tied off to arrest blood flow into the surgical field. A second suture is passed under the medial region of the vein to aid in vessel positioning. Scissors are used to form a small opening in the vein.

Step 3. Vein dilation
A vein lifter is used to hold open the vein while an introducer is inserted. The introducer is composed of both a vein dilator and a sheath. The vein is dilated.

Step 4. Removal of the dilator
Once the vein is dilated, the dilator portion of the introducer is removed, leaving the sheath in place.

Step 5. Lead insertion
The lead is inserted into the Cephalic vein through the sheath. It takes passage through the left Subclavian vein, left Brachiocephalic vein, and the Superior vena cava until it enters the right atrium.

Step 6. Sheath removal
Once the lead is inserted, the sheath is removed by snapping apart the left and right sides of the handle and pulling them in opposite directions to rip the sheath down the middle.

Step 7. Lead positioning
A stylet, a stiff and curved metal wire, is inserted through the lead and is used to guide the lead through the right atrioventricular valve and into the apex of the right ventricle. Several tries may be needed for proper lead positioning.

Step 8. Anchoring the lead
A sleeve is found towards the distal end of the lead and is used to secure the lead in place. It is secured to the underside of pectoralis major by means of a figure-of-eight suture that passes in the sleeve’s grooves to prevent lead fracturing. The proximal end of the cephalic vein is also tied off around the lead to prevent residual blood flow into the area.

Step 9. Subcutaneous pouch
A subcutaneous pouch is formed inferior to the incision by manually separating fat and skin away from fascia.

Step 10. Generator attachment
The lead is attached to the pulse-generating unit by means of a small screw and screw driver. The lead is coiled underneath the generator and the entire unit is placed into the subcutaneous pouch. The wound is closed.